 Skip to main content
A practical guide to installing bifold doors

Alexandra works in the marketing department, and in 2014, bought her first house, which turned out to be somewhat of a ‘project’. Since then, the whole house has needed renovating, which has helped her gain a knowledge of basic DIY, decorating and making the best of a small space.
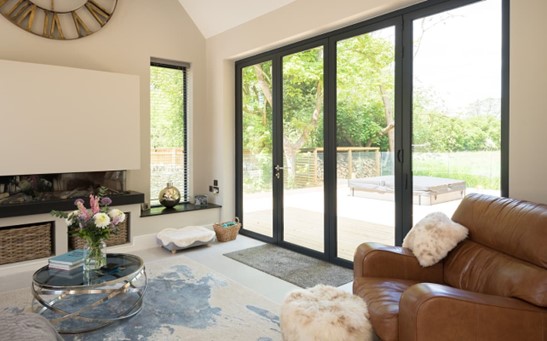
Our aluminium bifold doors offer your customers a huge range of customisable options, allowing flexibility to enjoy indoor and outdoor spaces as one. Here, we provide a detailed guide to installing Origin Bifold Doors.
Find out more below:
Preparing the outer frame
Prior to assembling the outer frame of a bifold, there are vital steps that need to be taken to prepare the frame for its installation. We recommend that the frame sections are unwrapped and laid out on to trestles, or a safe area.
Once laid out, the side jambs of the frame can be flipped on to their front to expose the jamb packers that are slotted into the back of the profile. These can then be prepared along the length of the jamb, to sit in the correct positions.
Are you interested in working with Origin? Read more about becoming a trade partner here.
The position of these packers, as shown in the video below, is crucial to ensure the fixings secure the frame in place to prevent any movement or twisting during operation.
Fixing holes can also be prepared at this stage, by using a 13mm counter sink bit, to allow the fixings to only bite on the outer layer of profile. Again, this is done to avoid twisting the profile, once it is installed into the opening.
A trick if you may be struggling with connecting the jamb to the track, we can advise to snip off a small corner of the block to allow these to be smoothly joined. It may still need some slight force, or use of a rubber mallet to knock the two sections of frame together.
Lastly, the ends of the track (and cill, if ordered) can be fully sealed with weatherproof silicone, prior to being fitted into the opening.
Read our tips on installing aluminium bifold doors here.
Assembling the outer frame
Firstly, if the product has a cill, the ends of the cill should be fully sealed with weatherproof silicone. There should then be a thin bead of silicone applied along the inner edge, along the length of the cill. This is all to prevent water tracking underneath the bottom track of the threshold, or out of the ends of the cill section.
The opening will then need to be levelled across the bottom using packing. The level will need to be checked across its width, and from front to back to ensure the track/cill will sit level in the opening.
Packing is vital to prevent thermal breaching of the outer frame.
The tracks can then be connected to the jambs using the connecting blocks installed on to the jambs. Depending on the length of the track it may require two people to assemble the frame, and then lift the frame into the opening safely.
Once the frame is in the opening, we recommend that the top corners are secured in place using winbags, or alternatively, using packers and a lever bar as shown in the video above.
Following the frame being lifted into the opening, we would recommend that the bottom track is checked for level again. If it is not sitting level, the opening can then be re-packed, before any further steps are taken.
Are you interested in working with Origin? Read more about becoming a trade partner here.
Fixing the frame
With the frame in the opening, the first step is to ensure that the top corners of the bifold are fully compressed, both internally and externally. The top track needs to be packed to secure it in place and provide a starting point to level the top track from.
The jambs then need to be checked for level, checking the vertical position on the inner and outer edge of the profile, as shown in the video.
Using the holes that are previously prepared in the jambs, fixing holes need to be drilled into the opening. The depth, and size to drill, will be dependent on the opening that you are fixing into, and the fixing screws required to secure the frame in place.
Once the fixing holes are prepared, the area behind the jamb will need to be packed against the opening to ensure the jamb sits level when fixed in place. The frame can then be fixed in place, and checked again to ensure it is still level on both sides. This fixing process should be followed for each of the 4 fixing positions on each jamb.
Getting the packing correct, and ensuring the jambs sit level is crucial in preventing the frame from twisting, bowing, or leaning once the door sashes are installed.
For the tracks, we then recommend that fixing positions are 100mm from the end of the track in both corners. From there the fixings should match every door sash along the width of the track - for example, a 3 door bifold would require 3 fixings along the width, in addition to the two corner fixings. More fixings may be required if there are any concerns around securing the frame.
After drilling each fixing hole along the bottom track, the fixing holes should be fully sealed with weatherproof silicone. This is to prevent any water in the track from making its way into the opening via the fixing hole. Fixing screws can then be applied to fix the track in place, and again checked for level throughout this process. The same steps can then be taken for the top track, without the need to seal the fixing holes prior to applying the fixing screws.
Installing the sashes
Firstly, you will need to insert the top fork wheels (provided in the components box) into the prepared holes in the end of the top track. The thick edge of the wheel should sit inside the track. The top fork can then be connected into the wheels, lifting it onto the track and dropping the prongs into the holes in each wheel.
For the bottom fork assembly (providing in the components box) the fork should be taken away from the trolley system as shown in the video. It is then key to check that the nut at the bottom of the fork is checked to be set at a 4mm gap, and adjusted if the gap is not 4mm. It can then be re-connected to the bottom trolley and slotted into the prepared hole at the end of the bottom track.
It is then time to hang the first hanging sash into the hinge jamb. Each door will have a sticker at the top of the profile to show which number door it is when viewed from outside.
The sash hinges will need to be lined up with the hinge pins in the jamb and dropped into place once aligned. Leaving this sash in the open position, the second hanging sash can then be slotted into the hinges of the first sash you have hung.
These two doors will then need to be maneuvered into the closed position, and here we recommend inserting a winbag underneath the furthest edge of the second door sash. The slave handle can then be used to lock the doors in position.
The third sash can then be connected to the centre hinge of the second door, and whilst in this position, the top hinge needs to be secured as shown using a screwdriver (or an item similar). This is to ensure that the door does not fall away and cause damage to the centre hinge that is supporting the weight.
Using the winbag under the corner of the second sash, the door can be lifted to the correct height, to allow the bottom fork to be connected to the bottom hinge. If winbags are not available, this will need to be carried out by lifting the sash manually to get the hinge located into the bottom fork.
The fork pin can then be inserted into the bottom fork and through the aligned hinge. It can then be secured in place by locking the top of the pin into the fork, ensuring it is flush with the top of the fork, and tightening the bottom screw using a T30 torx bit.
The screwdriver (or similar) can then be removed from the top hinge, to allow the fork to be connected to the hinge. The fork pin can then be used to connect the two, following the same process as the bottom fork. If either of the fork pins are tight to insert, it can be tapped in gently, as shown in the video, using a nylon/rubber mallet.
Glazing the sashes
Firstly, all beads need to be unclipped from the sashes, starting with the sides followed by the tops (bottoms too if required to lift the glazing in). When doing this it is important to hold the top bead in place to avoid it falling out of the sash when the sides are removed. The beads should then be stacked safely and in order to ensure that they are put back into the same original sash.
The sashes will then require 4mm glazing packers to be placed into the bottom corner of each sash. Glazing packers are slightly wider than standard packers and are key to preventing the glass from dropping over time. It is also crucial to avoid placing these packers on top of, or blocking the drainage holes in the profile.
Are you interested in working with Origin? Read more about becoming a trade partner here.
The glass can then be lifted into the sash, to sit on top of the two inserted glazing packers. The first sash to be glazed should always be the sash hinged to the jamb. When dropping the glass into the frame, ensure that the external gasket isn’t pulled away from the profile, or crushed in the corners.
Packing can then be applied to the bottom (hinge) side corner of the sash to push the glass over to the opposite side of the sash. The top corner on the opposite side of the sash can then be packed, again to re-position the glass, and to re-distribute the weight of the unit. Lastly a packer needs to be inserted in between the glass and the toe and heel plate in the top of the sash.
After packing the glass into the first sash, it is crucial to check that the sash is sitting at the right height. This can be checked by assessing the Qlon across the top and the bottom of the sash to confirm that there are not any gaps, or crushed seals (shown in the video). If any issues are discovered at this point, the glass will need to be re-packed to correct the height of the door sash. Alternatively, there is a small adjustment possible, using the toe and heel plate on the top of the sash. This can be accessed by opening the door and using a 4mm alan key to tighten the plate on to the glass and create compression.
Read more about the different bifold door panel and configuration options here.
This packing process should be followed on each sash, however the corners that require packing will depend on the configuration of the doors. These positions are shown in the video.
Once all doors have been glazed, the beads can be clipped back into the sashes, fitting the top/bottom first, followed by the sides.
The wedge gasket (supplied in the components box) can then be cut to size and inserted into the void between the bead and the glazing. We recommend that the top/bottom lengths of gasket are cut slightly long and slotted in behind the side beads. The side lengths should then be cut at a slight angle to meet the top/bottom wedge gasket to create a neat joint.
Choosing aluminium bi-fold doors for trade: Origin support
There are a wide range of bifold door manufacturers and suppliers available to choose from; however, choosing the right one can be hard. Alongside lead times and the quality of the doors, it’s also important to consider the support you will receive from your supplier to specify and install their doors.
Here are the factors you should consider when looking for bi-fold doors for trade:
Quality of the doors
The service on offer from the supplier you choose
At Origin, we have worked tirelessly to offer our trade partners all of the training and support they need to properly install our doors and explain the benefits to customers.
We offer training and support to make sure that we develop the best relationships with our trade partners. When you supply Origin Aluminium Bi-fold Doors, you can expect:
Strong relationships
An onboarding team to take you through the systems, people, processes and offer an extra level of support
Sales support with dedicated teams
Marketing support
Technical support and aftercare
Initial and ongoing training
A shared showroom
Continuous research and development.